
Halcyon Calc
Halcyon Calc Lite

Poll
What feature do you want in Halcyon Calc v4.1
Stats plotting
15%
Implement the FORM operation
31%
Built-in catalog of operations
8%
Built-in catalog of units
8%
Printing support
0%
iCloud support for user variables
23%
Other (add a comment)
15%
Total votes: 13
Halcyon Calc - Working With The UI
This document describes the interface features of the calculator. When you launch the calculator for the first time, you will be presented with a UI which resembles the image below. Actually, in the picture, there are items on the stack and something being entered which you will not have on initial startup. Instead, the entry and the stack will be empty but for demonstrative purposes, it is useful to see some data in those areas of the UI also.
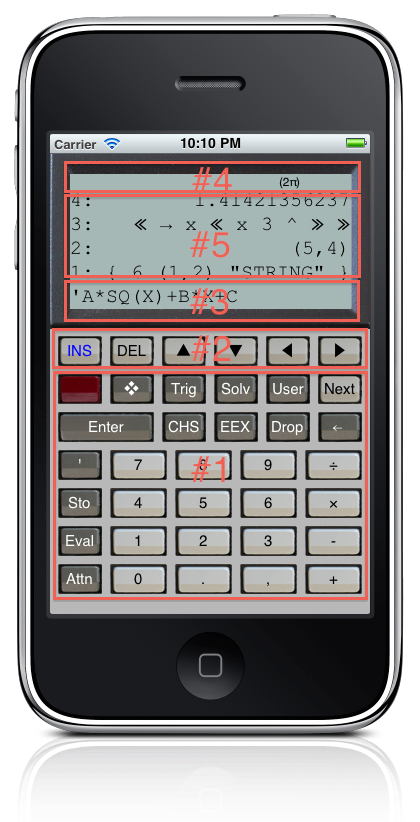
This image has labels on four key parts of the UI. Those elements are:
Each of those elements of the UI are described below.
The Main Buttons:
What is a calculator without buttons. On the image shown, you can see the standard buttons for the numbers 0 through 9. Also, there are the basic addition, subtraction, multiplication and division buttons. At the bottom, you will also see buttons for a period and a comma. The meaning of these buttons by default depends on "Region Format" setting on your device. In some regions (like much of Europe), the comma is used as the radix point separating the integer from the fractional part of a real number. In other regions (like much of North America), the period is used as the radix point. You can also use the RDX, operation to change this default behaviour to what you would like. Regardless, one of these buttons is used as a radix point, while the other is used as a separator. Peek at #4 in the image and you will see the complex number (5,4) and a real number 1.41421356237. So, in this image, period is the radix point and comma is the separator which is used, in this case, to separate the real and imaginary components of a complex number.
Other than these immediately recognizable buttons common on most calculator, there are others like "CHS" and "Drop" which will be explained in more detail later.
But before pressing any of the buttons in this area, try swiping to the left with your finger. And then swipe back to the right again.
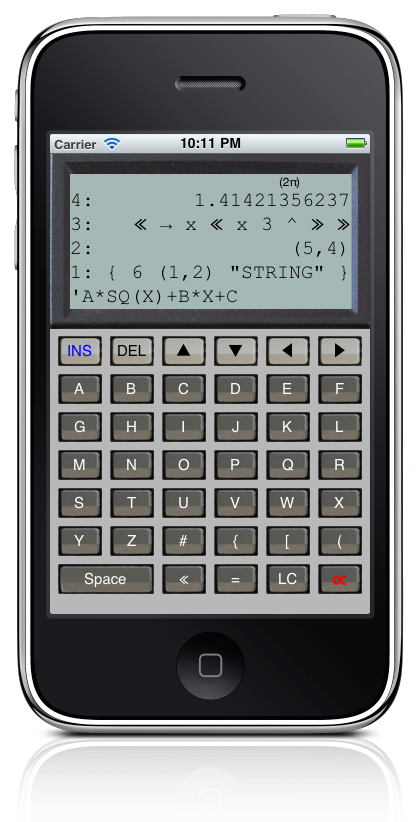
For basic usage, you shouldn't require the buttons on the left page but those buttons give you access to features like lists, integer arithmetic, and symbol expressions.
Also, if you tap the "LC" button on the left page, you can switch to lower case character mode. When you do so, the labels of the buttons affected automatically change to reflect that lower case mode is enabled. Also, the "LC" button glows blue which indicates that the calculator is in lower case mode. Blue text on a button is used to indicate that a corresponding mode is enabled and you will see that in other situations.
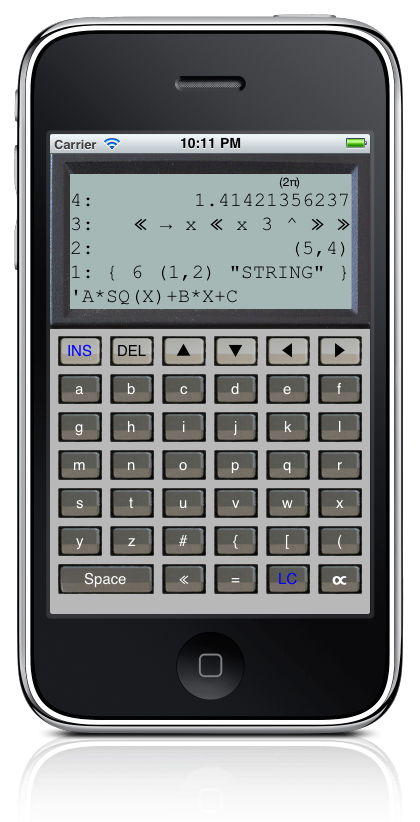
Lower case mode is "sticky". That means that when in lower case mode, the calculator will remain in that mode until you press the "LC" button again. You can even quit the calculator and return to it again later and it will still be in lower case mode.
On the right page of buttons, at the top left you will see a red button without a label. This is the "red shift" button and when pressed it gives you access to more capabilities, both on the left and the right page of buttons.

When you press red shift, the label on most buttons will change. However, some buttons have no other operation associated with them and the label remains the same after the red shift. The image to the left shows the right page of buttons with red shift on and note that 1, 5 and 6 are unchanged in the image. Lighter coloured buttons have their label drawn in red to indicate that red shift is on. Darker coloured buttons still are labelled in white to preserve readability.
If you press the red shift button a second time, the red shift turns off and the buttons return to their usual state. Also, red shift is not sticky. That means that red shift mode is automatically disabled after pressing any button.
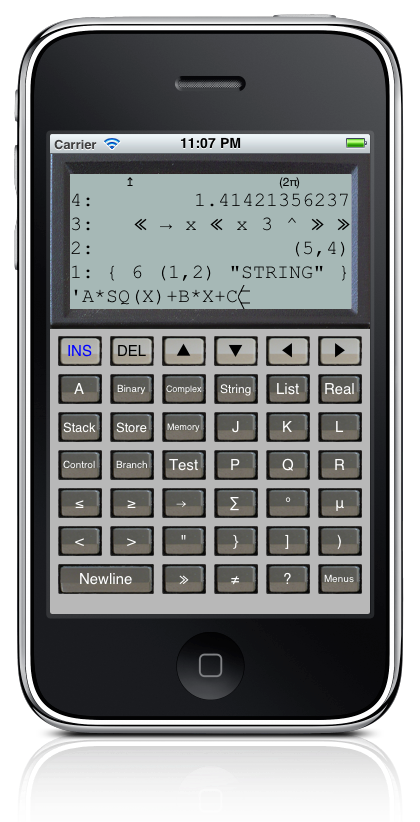
If you swipe to the left while red shift is on, you will see that some of the buttons on the left have different operations also. Many of the button towards the top of the page have been replaced by menu buttons like "Binary" and "Stack". For some people, they may very rarely use the letter buttons but might want quick access to these menu buttons. At the bottom right of the page, there is a "■Menu" button (when a button is described in red text proceeded with a red box, that button is accessible with a red shift) which swaps the behaviour of these buttons. When Menu mode is enabled, these buttons show their menu buttons when red shift is off and switch back to their letters when red shift is on. So, the "B" button will instead show the label "Binary" and open the binary menu when red shift is off but when red shift is on, it will become the "B" button. Depending on what you use more frequently, you may want to have menu mode on or off.
Also, menu mode is sticky. It stays on until you press the Menu button again. If you enable menu mode, the "■Menu" button's label will be coloured blue to indicate it is on. Menu mode is also preserved if you quit and restart the calculator.
Finally, the buttons themselves can be pressed. If you press and release the button quickly, you may or may not get any visual feedback but an audible click, like from the iPhone keyboard will be heard (actually, on the original iPod Touch, you will not hear that click unless you use headphones). If you press and hold a button, the button will grow larger so you can get some feedback which button you have pressed. If that is the button you want, you can release your finger to activate that button. If it is not the button you were aiming for, move your finger outside the bounds of the button and release. When you move your finger, a different button will not be pressed but the button you did press will not activate.
The Menu Buttons:
The menu buttons are a set of six dynamic buttons which change their label and behaviour depending on what menu has been selected. By default, the "INS", "DEL" and four arrow keys are shown on the menu buttons. The behaviour of these buttons will be described in the command line section. At any time, you can return to these six buttons by pressing the "❖" button which can be found on the right page, just to the right of the red shift button. The "❖" button is supposed to represent the four arrow keys on a single button which might help you remember what it is for.
The menu buttons themselves operate just like the main buttons. You get audible feedback when you activate the button and if you press and hold, you will get visual feedback when the button grows larger.
The default arrow buttons only have six menu buttons so a single page of menu buttons is all there are. But, if you press the "Trig" button on the right page, just to the right of the "❖" button a new set of buttons will slide in. The old buttons will slide up and the in this case, six trigonometry buttons will be visible. However, there are three pages of trig buttons. Swipe your finger towards the left on the trig menu buttons and a second set of trig buttons should be revealed. Swipe again to the left and you will see yet more buttons. If you try to swipe a third time, the buttons will slide to the left and then back again to indicate the end of the pages. Similarly, you can swipe to the right to see the previous page and swipe again to see the original page.
You can also use the "Next" and "■Prev" buttons to move to the next or previous page of menu buttons. If you press "Next" when on the last page of buttons, you are returned to the first page. Similarly, if you press "■Prev" when on the first page of buttons, you are sent to the last page of buttons.
The actual buttons which are available in these menus are best described in the Operations By Menu Reference.
The Command Line:
In the upper part of the calculator is the display. The display contains the stack and it also can show the command line. When you launch the calculator for the first time, the command line will be empty. When the command line is empty, it will not be shown at all. Instead, the display will show up to four items on the stack, filling the display.
However, if you press the "1" button, that will insert a 1 onto the command line. The display will move the stack up and the command line will be visible. The command line is left justified so you will see that "1" character on the bottom left of the display. If you now press the "Enter" key, you are instructing the calculator to interpret the contents of the command line and act on it. In this case, the calculator sees the number 1 so it puts that number at the top of the stack (which is actually at the bottom of the display, labelled as "1:", see the next section for details). At this point, the command line is cleared and your number 1 is on the stack.
Now try pressing the "2" button. The display again changes, showing the command line you have started to enter with that number at the bottom of the display. The stack moves up in the display to make room for the command line. Instead of pressing "Enter" again, press the "+" key. By default, most keys which are associated with an operation (like addition in this case) will cause the current command line, if any, to be interpreted before the operation executes. So, the "2" which is on the command line is interpreted by the calculator and because it is a number, it is pushed onto the stack. Then, the addition operation executes which gets the 1 and the 2 from the stack, adds them together and pushes the result, 3, onto the stack.
But, operations can also act differently sometimes. This time press the single quote button below the "Enter" key. This starts an expression. Then press the "1", then the "+" and finally the "2" buttons. Notice how this time, pressing "+" did not cause the calculator to interpret the command line and execute an addition. When you pressed the single quote and started building an expression, the calculator when into "algebraic" mode. In this mode, all operations which are valid in an expression will not execute right away but will instead be added to the command line. In this case, a "+" character was added to the command line so it should now look like:
'1+2
Similarly, if you press the SIN key from the Trig menu, then "SIN(" will be added to the command line. An operation which takes its parameters in brackets will add the open bracket automatically in algebraic mode. Look at the bottom right of the left page of main buttons and you will see the "∝" (alpha) button. With your expression still on the command line, you should see that the alpha button has its label drawn in red. That indicates that the command line is in algebraic mode. If you press the button, it will cycle between white, blue and red. White is normal mode. In that mode, pressing "+" or any other button associated with an operation will execute that operation. Red is algebraic mode, described here. Blue is alpha mode and is described more below. When you start an expression, the command line automatically goes into algebraic mode to make it easy to build that expression. But, you can override that mode at any time by pressing the "∝" button.
With your expression for 1+2 still on the command line, press "Enter". This causes the calculator to interpret the command line. It sees a valid expression and pushes that expression onto the stack. Note that it didn't calculate the result. See the Working With Expressions guide for more information about expressions.
The other mode controlled by the "∝" button is alpha mode. You can go into this mode manually by pressing the "∝" button until it is blue. Or, you can press the ■" button (found on the left page) or the "≪" button (also found on the left page) to automatically go into the alpha mode. The double quote button indicates that you are entering a string (see the Working With Strings guide for more information). The "≪" character is used to being a program. By default, the calculator switches to alpha mode when entering a program.
In alpha mode, all buttons associated with operations will insert a character representation of themselves onto the command line. Unlike in algebraic mode, even operations which are not valid in an expression will be added to the command line. Also, brackets are never appended like they are in algebraic mode. But, a space may be inserted before the operation to separate it from anything else already entered. A space is always added after the operation name. So, pressing the SIN button from the "Trig" menu in alpha mode will add " SIN " or "SIN " to the command line (a space is prepended to separate it from existing characters on the command line, if necessary).
Also, the command line presents another way to execute an operation. You can execute the SIN button from the "Trig" menu by pressing the button but you could also press the "S", "I", "N" and finally "Enter" buttons. If you know the name of the operation you want to execute, it may be quicker in some situations to type the operation rather than bring up the menu and hit the button.
No one is perfect and thankfully, the button "←" can be used to delete the character before the cursor on the command line. You can delete one character or, by pressing the button multiple times, you can delete many characters. If you delete all characters on the command line, the command line itself will disappear making more room on the display for the stack. But, that is not the only editing tools the calculator gives you for the command line.
If entering a great deal of information, the command line will wrap. If you press the "❖" button, the menu buttons will become editing buttons for the command line. The four arrow buttons allow you to move the cursor position on the command line. The INS button indicates whether the calculator is in insert mode or not. The INS button will be drawn with a blue label if insert mode is enabled. When in insert mode, any characters entered will be inserted into the command line at the cursor point. Characters after the cursor point are preserved. When not in insert mode, characters entered will overwrite any characters after the cursor point. The DEL button removes the character after the cursor. These buttons allow you to manipulate the command line and fix any mistakes you might have made.
You may have noticed that the cursor changes shape sometimes. There are two factors which influence the appearance of the cursor. First, the cursor appears different if the command line is in insert mode versus replace mode, as selected by using the INS button. Second, the cursor appears different based on the entry mode. This gives you an indication whether the calculator is in immediate, algebraic or alpha entry mode. The following table describes the different cursor appearances:
| Insert Mode | Replace Mode | |
|---|---|---|
| Immediate Mode |  |
 |
| Algebraic Mode |  |
 |
| Alpha Mode |  |
 |
Sometimes, it is easier to start with a new command line than to edit the existing one. You can clear the entire command line by pressing the "Attn" button at the bottom left of the right page of buttons. The "Attn" button is short for attention and is a general "cancel everything" button. It can be used to clear a command line and also to interrupt a long running operation.
There are a couple more buttons which are useful for manipulating the command line. The "■Edit" button allows you to put the item from the top of the stack onto the command line. From there, you can edit the command line and then when you press enter, the new value entered will replace the one you were editing on the top of the stack. Similarly, the "■Visit" button allows you to do the same thing, but with any item on the stack. Push the number of the item on the stack you would like to edit and the press the "■Visit" button. The item will now be on the command line and when you finish editing it, you can then replace that item on the stack with your new value.
Finally, the "■Command" button allows you to recall one of the last four command lines entered on the calculator. Press the "■Command" button once to recall the last command line. Press it a second time to recall the previous command line. Continue pressing it to recall the third and fourth command line. Press it a fifth time and it will return to the most recent command line. Once you have recalled the command line you are looking for, you can use the editing buttons to manipulate the command line before you enter it. Also, you can always press "Attn" to clear what you are doing if things go wrong for any reason.
The other guides will describe how to enter real numbers, complex numbers, lists etc. But, there are some tricks you can use with the command line which applies to all types of data you enter. The command line can be used to enter multiple items at a time. If you hit "1", then the space button and then "2" and finally "Enter", you will see that both 1 and 2 are pushed onto the stack. You can enter multiple things on a single command line if they are separated by a space, a new line or the "separator character". As described above, if the radix character is period, then the separator character is a comma or vice versa. So, assuming that the radix character is a period, you could also enter "1,2" into the calculator and both 1 and 2 will be pushed onto the stack. This can sometimes be a great short cut. If you are entering symbols like X and Y, you can put multiple symbols into the command line and keep the main buttons on the left page if you separate them with a space character.
If you double tap on the command line, options to copy and paste from/to the command line will appear. If you select copy, the current command line is stored onto the clipboard. You can then use that data in another application or paste that back into the calculator. Note that if you double tap on an item in the stack, you can copy that item onto the clipboard. Also, if you select paste after double tapping on an item on the stack, it actually pastes onto the command line, not onto that item in the stack. All data entry is to the command line.
The Annunciators:
Along the top of the display, the calculator may show a series of icons which can help you identify what state the calculator is in. The following icons may be visible in this section:
| Annunciator | Indicates... |
|---|---|
| ° | There is a suspended program (see the Working With Programs guide for more information). |
| ↥ | The red shift key, "■" has been pressed. |
| α | The calculator is in alpha entry mode. |
| ((●)) | The calculator is busy (press "Attn" to interrupt the calculator). |
| (2π) | The calculator is in radians mode. See RAD and DEG for more information. |
The Stack:
The stack consists of a series of items which are results of computations, intermediate results or anything else which can be represented on the calculator (like lists or strings). The item at the top of the stack is at the bottom and is labelled "1:". In the picture, that item is the complex number (5,4). In the picture, there are two other items visible on the stack, labelled "2:" and "3:".
The operation of the stack is conceptually described in the RPN Quick Start Guide. Also, specific operations for manipulating the stack on this calculator are described in the Working With The Stack document.
However, there are some things you can do from a UI perspective which helps to visualize the stack. First of all, you can swipe up and down to scroll up and down through the stack. If you have many items on the stack, you normally only see the top 3 or 4 items. But, with a quick swipe, you can inspect other items easily.
Also, you can use the "■View↑" and "■View↓" buttons to change what item appears at the bottom of the display. Normally, the top of the stack, labelled "1:" is shown at the bottom of the display. If you press the "■View↑" button once, the bottom of the display will now show the item labelled "2:". The item at the top of the stack still exists, it is just not displayed. Continually pressing the "■View↑" button will hide more and more items from the top of the stack and make items deeper in the stack visible. Pressing the "■View↓" button reverses the affect. However, this isn't as convenient as just scrolling through the stack with your finger.
As described in the command line section, you can double tap on an item on the stack and then select "Copy" to copy that stack item to the clipboard. You can use that data within the calculator or in another application. If you double tap on a stack item and select "Paste", the contents of the clipboard are not pasted onto that stack item but are instead appended to the command line. All data entry is sent to the command line and not directly to items on the stack.
Finally, items on the stack may be truncated if they cannot fit on a single line. The exception to this is the item at the top of the stack (the bottom of the display). By default, that item will not be truncated and multiple lines of output will be used to display that item in full. That behaviour can be changed by using the ML operation (ML stands for multi-line) in the "■Mode" menu. Also, you can use "■View↑" and "■View↓" to change the item shown at the bottom of the display, allowing you to see an non-truncated version of other items in the stack.